Food Stylist

Recipes

Carolines delicious triple tested fail safe recipes produced over her years of food preparation and styling experience. Yum!

Asian Chicken Noodle Soup with dumplings

An Asian twist on a classic, this chicken noodle soup is healthy and delicious.


250g dried egg noodles

1.5 lt chicken stock

1 tsp minced ginger

1 star anise

1 cinnamon stick

1 Tbsp palm sugar

1 Tbsp soy sauce

2 Lilydale chicken breast fillets

1 bunch Chinese broccoli, sliced

1 carrot, julienned

1 Lebanese cucumber, julienned

120g bean sprouts, trimmed

4 spring onions, finely sliced

12 chicken gyoza*

Handful coriander leaves to garnish

2 Tbsp crushed peanuts

Sriracha chilli sauce


1.     Cook noodles according to packet instructions, then drain and rinse under cold water. Set aside.

2.     Place stock in medium pot with ginger, star anise, cinnamon, palm sugar and soy. Bring to the boil.

3.     Add chicken, reduce heat and gently cook for 5 minutes, until the chicken is cooked. Remove from pot and set aside. When cool enough to handle, shred into bite size pieces.

4.     Add the Chinese broccoli and carrot to the stock and cook until just tender. Add the noodles and heat through gently. Return the chicken pieces to the pot.

5.     Ladle the soup into serving bowls, top with chicken gyoza, garnish with cucumber, bean sprouts, spring onions, peanuts, sriracha sauce and fresh coriander.


Serves 4.


Chicken gyoza

500g Lilydale chicken mince
½ cup tinned water chestnuts, finely chopped
3 spring onions, finely chopped
2 tsp minced ginger
1 egg white
2 tsp salt
1⁄4 (quarter) tsp white pepper
250g packet fresh gyoza wrappers

1 Tbsp vegetable oil

½ cup chicken stock


*To make the gyoza, mix the chicken mince with the water chestnuts, spring onions, ginger, egg, salt and pepper. Fill the gyoza pastry, pleating the pastry along one edge, sealing the edges well with water. Heat a large shallow frypan with 1 tablespoon of oil and fry gyoza on one side until the pastry is golden. Reduce heat, add half a cup of the chicken stock, cover with lid and steam until liquid has evaporated. Check that filling is cooked.


Makes 28.

Extra gyoza can be frozen uncooked. Freeze in one layer on tray, then can be placed in freezer bags.


Black Bean Chilli

Black bean chilli


Chilli con carne just got easier with the availability of tinned black beans. If you can’t find these, then soak your beans overnight and add them to the pot with the beef, as they will need a longer cooking time.


2 tbsp olive oil + extra if required

2 brown onions, chopped

2 garlic cloves, finely chopped

2 green chillies, deseeded and finely chopped

500g chuck steak, cut into small pieces

2 tbsp plain flour

2 x 400g tins chopped tomatoes

2 x 400g tins black beans, drained and rinsed

1 red capsicum, diced

1 ripe avocado

1 punnet cherry tomatoes

½ red onion, diced

handful fresh coriander leaves, plus extra to garnish

1 lime, juiced

sea salt and freshly ground black pepper to season

4 Tbsp sour cream to serve


Preheat oven to 150C.

Heat oil in a large heavy based oven proof pot and cook onion, garlic and chilli until softened. Remove from pot and set aside.

Toss steak in flour to coat then cook in batches in the pot until browned, adding extra oil if required.

Return the cooked vegetables to the pot and stir in the tomatoes. Put on the lid and place in oven to cook for 1½ hours.

Remove from oven and check if meat is tender. Add beans and capsicum and return to oven for a further 30 minutes.

Meanwhile, make the salsa. Chop avocado into small dice, quarter the cherry tomatoes and mix with red onion and coriander leaves. Squeeze over lime juice and season with salt and pepper.

Remove chilli from oven and serve with salsa and sour cream.


serves 4-6.


The perfect soup for winter

This is one of my favourite soups. It is highly adaptable and I love that you can add whatever ingredients you have on hand, to use up any vegetables lurking in the fridge. No waste here.

ingredients:

100g peal barley

2 tbsp olive oil

1 tsp mustard seeds

1 tsp cumin seeds

1 bay leaf

2 cloves

1 cinnamon stick

1 tsp ground turmeric

1 tsp paprika

1 tsp ground coriander

1 onion, chopped

2 cloves garlic, sliced

1 parsnip, peeled, chopped

200g pumpkin, peeled, chopped in bitesize pieces

200g sweet potato, peeled, chopped in bitesize pieces

225g red lentils

2 tomatoes, chopped

1 tsp grated ginger

zest and juice of 1 lemon

  1. Cook the pearl barley following packet directions. WHen tender, drain and set aside.

  2. Meanwhile, heat oil in a large pot, add the spices and cook for a few minutes until fragrant. Add onion and garlic and continue to cook until softened.

  3. Add vegetables and stir to coat with the seasoning.

  4. Add lentils, pearl barley and 1.5 litres of water. Bring to boil, then reduce heat and cook until vegetables are tender. Add extra water if required.

  5. Check seasoning, add ginger and lemon to taste.

Serves 6.

Chocolate crackles for Halloween

I love making chocolate crackles. This version uses good quality chocolate -use your favourite.

For Halloween, I found some eyeball gum candy. I also made some chocolate crackle “graves” and added a chocolate toombstone. Spooky!!

This traditional recipe makes about 16 crackles in patty pans (more if you use mini patty pans).


200g Milk Chocolate - ~40% cocoa

100g Dark Chocolate - min 70% cocoa

3 cups Rice Bubbles (not home brand - they're not as 'inflated' and don't crunch when you eat them)

1 cup shredded or flaked coconut (McKenzies Moist Flakes are best)


Place all the chocolate in a large bowl over a saucepan of water and bring to the boil, then remove from heat. Make sure the bowl isn’t in contact with the water.

Stir occasionally to combine and prevent it from sticking.

In a separate bowl, combine the rice bubbles & coconut.

Next get a tray, rack or platter that will fit on a shelf of your fridge and lay out 16 patty pans - a baking tray with a lip is perfect to prevent them sliding off as you carry the tray! Place them so that they touch, as the mix has a tendency to drip and any excess will fall into the next patty pan.

Once the chocolate is completely melted & uniform in colour, remove from the heat, and add in the dry ingredients. Using a heat proof spatula or flat metal serving spoon, combine the mixture by repeatedly sliding the spoon down the edge of the bowl under the mix, and then drawing towards the center, turning the bowl as you go. This sliding motion prevents you from crushing the rice bubbles, preserving the 'crackle'!

Continue until all the dry ingredients are coated in chocolate.

Take two spoons to distribute the mix - a dessert & teaspoon, or two teaspoons, depending on the size of your patty pans. Scoop some mix onto the spoon in your favoured hand, and use the second (smaller) spoon to scrape it into the patty pan. You might also need to use the second spoon to occasionally scrape clean the base of the main spoon to avoid excess drips.

Fill the pans in two passes so that you get an even distribution.

It also allows the mix to settle into the pans, so you can fit more in!

Once all the pans are full - add more pans if you need to - place the tray into the fridge for about 30-60 mins, or until set - depending on your fridge. Remove from fridge about 5 mins before serving.

Caroline Velik
Italian potato doughnuts

“Doughnuts. Is there anything they can’t do?” Well, that’s what Homer Simpson thinks, anyway. Whether it’s true or not, doughnuts have certainly conquered the world. Almost every country has its own version of a doughnut. France has beignets, Italy has bomboloni, Spain has churros and Germany has berliners. Less well known are Belgian smoutebollen, Russian ponchiki and Israeli sufganiyot.

Not all doughnuts are created equal. In Japan, they can be filled with sweet adzuki bean paste. In Thailand, street hawkers sell deep fried snacks known as Patongkos. In Indonesia, donat kentang are made from flour and mashed potatoes.

Australians are partial to a hot jam doughnut.

For as long as I can remember, doughnuts have punctuated my existence: from early memories of cloyingly sweet pineapple doughnuts at the school tuckshop, through to amazing bomboloni during travels in Italy. As I’ve grown up, my tastes may have changed, but I still enjoy doughnuts. And they’re easy to make.

And the best thing about making your own doughnuts is that you get them while they’re hot.

Italian potato doughnuts

½ (half) cup milk

2 tsp dry yeast

500g  baking potatoes, like Ranger Russets, peeled and cut into chunks

2 eggs

3 ½ (three and a half) cups plain flour

2 tbsp sugar

¼ (quarter) cup extra-virgin olive oil

1 orange, zested and juiced

2 lt rice bran oil for deep frying

3 tbsp lemon juice

150g icing sugar


In a small saucepan, heat the milk over low heat until warm. Add the yeast to the milk and allow to sit for 15 minutes.

Meanwhile, place the potatoes in a large pot, cover with water and bring to the boil, cooking until tender. Drain and pass through a food mill or ricer and place in a large bowl. Add the eggs, flour, sugar, 1/4 (quarter) cup oil, juice, and zest of orange and mix well to combine. Add the yeast mixture and knead well, adding more flour if necessary to keep the batter from becoming too sticky. Cover and let the dough rise in a warm place for 1 hour, until doubled in size.

Roll the dough out on a lightly floured bench to approximately 2 cm thickness.

Use an 8cm round cutter to cut the doughnut shapes.  Cut a small hole in the middle of each doughnut with a small cutter, or simply poke through a hole with your thumb. Re roll the doughnut off-cuts to use up the remaining dough. Place the doughnuts on a baking paper lined tray, cover with non-stick baking paper and a clean tea towel and let rise for another 15 minutes.

Heat oil in deep fryer to 190C.

Working in batches, fry the doughnuts until golden brown, about 5 minutes, turning over halfway through. Remove with a slotted spoon and allow to drain on a plate lined with paper towels.

Make the lemon icing by mixing the lemon juice with icing sugar in a shallow bowl to a runny consistency.

Dip the doughnuts in the icing, then serve.


Makes 12-14 doughnuts.

Orange yoghurt syrup cake

Orange yoghurt syrup cake


This delicious, moist cake can be served warm from the oven with a little extra yoghurt on the side.


125g butter, softened

250g caster sugar

2 large eggs

1 cup Greek yoghurt

1 tsp pure vanilla extract

zest 2 oranges

3 tbsp orange juice

400g self raising flour

½ tsp bicarb soda

syrup:

1 cup caster sugar

1 cup water

4 tbsp orange juice

2 oranges, segmented

1 pink grapefruit, segmented


Preheat oven to 180C.

Grease and line a 23cm cake tin with removable base.

Cream butter and sugar in an electric mixer until light and fluffy. Add eggs, one at a time and continue to mix until combined. Add yoghurt, vanilla, orange zest and juice and mix. Add flour and bicarb and gently fold through.

Place mixture in cake tin and smooth the surface. The mixture will be quite firm.

Bake for 45 minutes, or until cake is cooked through.

Meanwhile, make the syrup. Combine sugar, water and juice in a small saucepan and cook over low heat to dissolve the sugar. Simmer for 10 minutes. Remove from heat and add citrus segments.

When cake is cooked, remove from oven and poke all over with a bamboo skewer, to make lots of small holes. Slowly pour the orange syrup over the hot cake until it is all absorbed and place the citrus segments in the middle.

Allow to cool, then remove from tin.

lemon yoghurt syrup cake

This lemon yoghurt syrup cake has lovely lemony tang. It is not overly sweet and the syrup soaks into the cake, without making it too wet. I think it is at its most delicious, served still slightly warm. Dollop with extra yoghurt, if you like, but it doesn’t really need it.

lemon yoghurt syrup cake

A lovely, moist cake with a lemony tang.


125g butter, softened

250g caster sugar

2 large eggs

1 cup greek yoghurt

1 tsp pure vanilla extract

zest 2 lemons

3 tbsp lemon juice

400g self raising flour

½ tsp bicarb soda

syrup:

1 cup caster sugar

1 cup water

4 tbsp lemon juice

2 lemons, finely sliced


Preheat oven to 180C.

Grease and line a 23cm cake tin with removable base.

Cream butter and sugar in an electric mixer until light and fluffy. Add eggs, one at a time and continue to mix until combined. Add yoghurt, vanilla, lemon zest and juice and mix. Add flour and bicarb and gently fold through.

Place mixture in cake tin and smooth the surface. The mixture will be quite firm.

Bake for 45 minutes, or until cake is cooked through.

Meanwhile, make the syrup. Combine sugar, water and lemon juice in a small saucepan and cook over low heat to dissolve the sugar. Add lemon slices and simmer for 10 minutes, to soften the lemons. Set aside.

When cake is cooked, remove from oven and poke all over with a bamboo skewer, to make lots of small holes. Slowly pour the lemon syrup over the hot cake until it is all absorbed.

Place the lemon slices decoratively on top.

Allow to cool, then remove from tin.

Sweet potato, pumpkin and parsnip with chickpeas and spinach

This vegetarian braise is great for meat-free Mondays. Look out for pearl cous cous, which is larger than regular cous cous. The lemony yoghurt adds a refreshing zing.


2 tbsp oil

2 onions, cut in half then thinly sliced

1 tsp cumin seeds

1 tsp coriander seeds

500g sweet potato, cut in 1.5 cm thick chunks

500g pumpkin, cut in 1.5 cm thick chunks

2 parnips, cut 1.5cm thick

800ml vegetable stock

2 tbsp honey

50g unsalted butter

1 cup pearl cous cous

2 x 400g tins chickpeas, drained and rinsed

100g baby spinach leaves

fresh coriander leaves to garnish

fresh mint leaves to garnish


yoghurt sauce:

100g greek yoghurt

juice and zest 1 lemon


Heat oil in large wide based pan, add onions, cumin and coriander seeds and cook over medium heat for 5 minutes until softened and golden.

Add potato, pumpkin, parsnips, stock, honey and butter. Bring to the boil, then reduce heat to simmer for around 15 minutes.

Add pearl cous cous and cook for a further 15 minutes until vegetables are cooked and liquid has reduced.

Add chickpeas and spinach and cook for a few minutes until spinach has wilted.

Remove from heat and set aside to rest whilst you make the yoghurt sauce.

Mix the yoghurt with lemon juice and zest and put in a jug to serve with the  vegetables.

Garnish the stew with fresh coriander and mint and serve with the yoghurt sauce.


serves 4.

Caroline Velik
Steamed oat porridge with native flavours

Recipe


1 cup groats (or rolled oats)

3 Tbsp (60 ml) macadamia oil, divided

2 cups (500ml) coconut milk

Pinch Murray River salt flakes

40g dried quandong

2 Tbsp (40ml) Bush honey, plus extra to drizzle

100g macadamia nuts

1 mango cheek, finely sliced

1 finger lime, halved

Native river mint leaves to garnish

Coconut yoghurt, to serve


Method


1.     Roll the oats, then set aside.

2.     Heat 2 tablespoons of oil in a shallow frypan. Add one cup of oats and gently cook for a few minutes until aromatic.

3.     Add coconut milk and a good pinch of salt to season. Stir well.

4.     Put the pan into the steam oven, set the temperature to 100C, steam setting 100% and cook for 15 minutes.

5.     Place the quandong in a shallow tray with a splash of water. Place the tray in the steam oven alongside the oats.

6.     Whilst the oats are cooking, make the honey roasted macadamias. In a small pot, put the remaining tablespoon of oil with two tablespoons of honey. Heat until melted and bubbling. Add the macadamias and toss to coat. Pour onto a lined baking tray and cook in a preheated oven at 180C for about 10-15 minutes, until golden brown.

7.     Carefully remove the oats and steamed quandong and set aside until cool enough to handle. Stir the quandong through the porridge.

8.     Remove the roasted nuts from the oven and set aside to cool. Roughly chop.

9.     Ladle some porridge into a serving bowl.

10.  Place the mango on top of the porridge with the chopped macadamias. Squeeze over the finger lime halves to release the citrus pearls.

11.  Garnish with mint, drizzle with honey and serve with a spoonful of coconut yoghurt for extra creaminess.


Serves 2.

Homestyle Baked Beans

homestyle beans with smoky bacon and maple syrup

4 slices thick cut smoky bacon

1 onion

2 tbs oil

400g tin diced tomatoes

1 tbs brown sugar

4 tbs maple syrup 

2 tbs worchestershire sauce

4 x 400g  cans white beans, drained and rinsed

1 bay leaf

salt and black pepper to season

4 tbs raw sugar

Heat oven to 160C.

Slice bacon thinly and finely dice onion.

In a large ovenproof cast iron dish, heat oil and sauté bacon and onion for 5 minutes. Add tinned tomatoes, brown sugar, maple syrup and worchestershire sauce. Stir well.

Add drained beans and bayleaf. Add two cups of water and season with salt and pepper. Cover tightly with aluminium foil, place in oven and bake for 1 ½  hours. Remove foil and sprinkle over raw sugar. Continue to bake, uncovered for 30 minutes.


serves 6.

Monte Carlos

When the baking mood hits you, a batch of biscuits is not only quick and easy to whip up, but extremely satisfying. 

These old fashioned recipes can be made by hand, as my mother and grandmother did, or whipped up using an electric mixer or food processor.

For the baking novice, there are a few rules to follow.

Start with the ingredients at room temperature. If your butter is cold, use a grater to break up into small pieces. Otherwise, microwave in short bursts to soften.

To bring eggs to room temperature, take them out of the fridge 30 minutes before you plan to use them. Alternatively, you can warm them up very quickly by placing them in a bowl of warm water for 5-10 minutes.

Sifting flour and other dry ingredients together helps to integrate and aerate the mixture. Sift onto a piece of baking paper to make it easier to add to the mixing bowl.

When using cup and spoon measures, check that they are Australian Standard Metric measures. An Australian metric tablespoon is 20ml and a cup is 250ml. Many kitchenware shops sell cup and spoon measures that have been designed overseas, where the measurements are different. This can lead to disaster when baking.

When measuring flour using a cup, first stir the flour in its container to aerate and lift it. Then scoop out the required amount, heaping it slightly in the cup. Level it off with the back of a knife. Don’t be tempted to tap or shake the cup, as the flour shouldn’t be packed in.

A more failsafe approach is to weigh all ingredients. Digital scales are a good investment as your measurements will be accurate.

The following recipe for Monte Carlos is for old fashioned, filled biscuits. So find an excuse to get baking. And may these become some of your family favourites.

Monte carlos

190g butter at room temperature

1 tsp vanilla essence

125g brown sugar

1 large egg

150g self raising flour

100g plain flour

¼ (quarter) tsp bicarb soda

75g fine dessicated coconut

½ (half) cup raspberry jam

cream filling:

75g butter

½ (half) tsp vanilla essence

2 tsp milk

190g icing sugar


Preheat oven to 180C.

Beat butter, vanilla and sugar with an electric mixer until just combined. Add egg and beat to combine.

Sift flours with bicarb soda and add to butter mixture in two batches, alternating with coconut. Mix well.

Roll 2 tsp of mixture into ovals, place on lined oven trays and flatten slightly with the back of a fork. Allow room for spreading.

Bake for 7-10 minutes.

Remove and cool on trays for a few minutes to firm up, then lift onto wire racks to cool completely.

To make the filling, beat butter, vanilla, milk and icing sugar in a small bowl until fluffy. 

Place a small amount of raspberry jam on the flat side of one biscuit and spread some icing on the flat side of a similar size biscuit. Sandwich both biscuits together. Repeat with remaining biscuits.


Makes 28 filled biscuits.

Comfort Food

Care packages

We are constantly being warned about the dangers of comfort foods; food that we turn to when we’re feeling down, food that fills more than just our hunger pangs. However, what if this is actually the point? Food has the ability to nourish more than just our stomachs.

At some time in your life, a dear friend or family member may need your help. Whether they have had a bad accident, a serious operation, or they are in the midst of a crisis, you can show them that you care, simply by cooking for them. Not only is it practical, it makes everyone feel good. Nothing tastes as good as a homemade meal kindly dropped at your doorstep. It doesn’t have to be anything fancy. In fact, simple home cooking is the best, when it has been made with extra love and care. Especially for Melbournians and Victorians, during the current lockdown and restrictions, I think it is safe to say that we all need a little bit of comfort. And if you happen to live in any of the areas affected by the recent storms, you definitely qualify for some extra TLC.

Here are a few tips when making up a care package. Use disposable containers: they are easy to transport, store, reheat and no washing up required.

They are also practical as you can write any cooking or reheating instructions on the lid. Include a copy of the recipe: it lists all the ingredients (in case of allergies) and besides, if your friend likes what you have made, they may make it again.

Don’t forget to include vegetables or salad ingredients. You can prep these by washing, peeling and chopping. You can boil some potatoes, ready to be roasted.

 So next time you are cooking, make up double the quantity and send some off to someone you love.

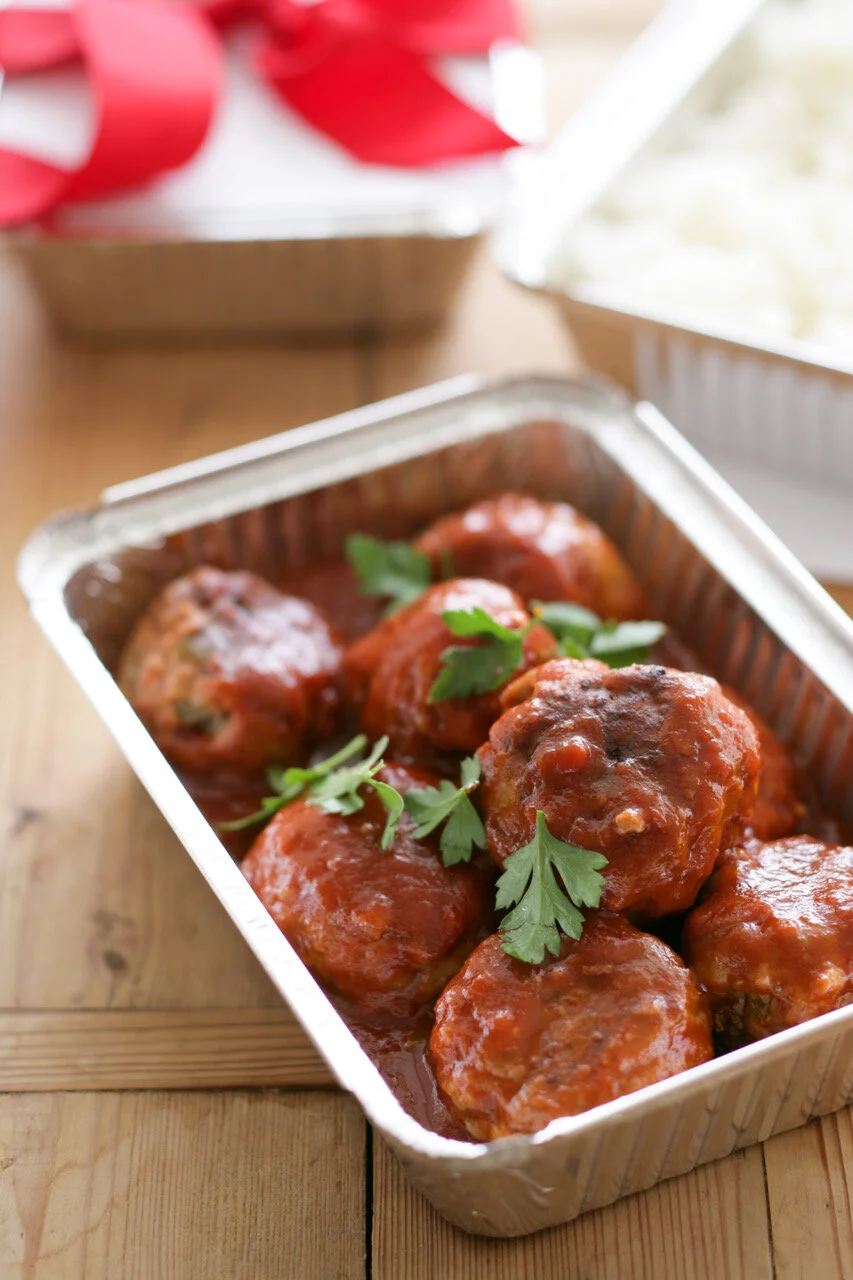
Mum’s meatballs in barbecue sauce

What could be more comforting than your mum’s recipe? If possible, ask your butcher to mince some topside. Make up a double quantity and package some up for a friend.


500g  mince beef

1 cup soft breadcrumbs

1 onion, finely diced

1 green pepper, finely diced

1 egg, beaten

salt and freshly ground pepper

½ (half) cup plain flour

2 tbs olive oil

1 cup tomato sauce

1 cup water

1 tbs sugar

1 tbs worchestershire sauce

1 tbs white vinegar

few drops of Tabasco (optional)

1 tsp celery salt


In a medium bowl, place the mince, breadcrumbs, onion, capsicum and egg. Mix well and season with salt and pepper.

Place flour on a large, flat plate.

Roll mixture into balls and gently coat in flour.

Place oil in a medium frypan and heat. Add the meatballs and brown on all sides. Remove and set aside. Wipe out the frypan, then add tomato sauce, water, sugar, worchestershire, vinegar, Tabasco and celery salt. Stir to combine. Bring to boil, reduce heat, add meatballs and simmer, covered, for 40 minutes, turning halfway through.

Serve with rice or creamy mashed potato.


Serves 4.

Chilli chocolate truffles

chilli choc truffles


You won’t believe how easy it is to make these delicious chocolate truffles. Use the best quality chocolate you can afford and you won’t be disappointed.


200ml thickened dream

1 long red chilli, chopped

½ tsp ground cardamon

½ tsp ground cinnamon

300g good quality dark chocolate (58% cocoa content)

dutch cocoa powder to coat


To a small pot, add the cream, chilli and spices. Heat gently to warm, then remove from heat and allow the flavours to infuse for 20 minutes. Strain the flavoured cream through a sieve to remove and discard the chilli. Bring a saucepan of water to the boil. Remove from heat. Place a heatproof bowl over the top and add the flavoured cream and choc pieces. Make sure that the bottom of the bowl doesn’t come in contact with the hot water underneath. Set aside until the chocolate melts. Stir well to combine.

Pour into a flat container (a plastic takeaway container is ideal) and refrigerate.

Scoop into small balls with a teaspoon or melon baller and roll gently in cocoa powder.


makes about 35 truffles.


Hazelnut and chocolate Baci di Dama

Hazelnut and chocolate baci di dama


Baci di Dama means ladies kisses. They are like little mouthfuls of heaven.


¾ cup hazelnuts

1 cup icing sugar

125g butter, softened

zest of 1 lemon

1 cup plain flour

120g dark chocolate (between 58 -70% cocoa content)


Preheat oven to 180C.

Place hazelnuts on an oven tray and heat in oven for 5 minutes. Remove and place hazelnuts in tea towel. Rub vigorously to remove the skins. Allow to cool.

Process the hazelnuts with icing sugar in a food processor until finely ground.

Add butter and lemon rind and process until creamy.

Remove from processor and gently incorporate flour until just combined (do not over mix).

Use a teaspoon to scoop up a small amount of mix and roll into a ball. Place on lined oven trays, well spaced to allow for spreading.

Bake for 12-15 minutes until lightly golden, then cool on trays on a wire rack.

Melt chocolate in a glass bowl over a pot of just boiled water from the kettle or in a microwave on medium power for 1 minute or so. Stir until smooth and glossy.

Spread a small amount of chocolate on one side of the cooled biscuit, then sandwich with another biscuit. Repeat with remaining biscuits.


Makes 60 filled biscuits.

Valentine's Day treats

Hit the sweet spot with these Valentine’s Day treats


Homemade + Chocolate = Valentine’s Day success.

Try these easy recipes and share a little love around.

When choosing chocolate for cooking, know your percentages. Basically, all chocolates contain various ratios of cocoa powder, cocoa fat and sugar.

The cocoa content is listed as a percentage. So “70%” refers to chocolate with 70% cocoa and cocoa fat and the remaining 30% sugar. The percentage indicates the balance between chocolate flavour and sweetness. The higher the percentage, the more bitter the chocolate.

For most baking, I use a chocolate with around 58% cocoa content.

Start with my fudgy chocolate brownies. Such a simple recipe, all made in one pot. The important principle for a perfect brownie is to get the baking time right; undercooked and it’s too gooey, overcooked and it’s cake. For moist and delicious brownie, you will need to take it out of the oven whilst it’s still very moist. A skewer inserted will be covered with lots of gooey crumbs. The top should be set, risen and slightly cracked.

For more baking, try the baci di dama (ladies kisses). These delicate little hazelnut and lemon flavoured biscuits are sandwiched together with dark chocolate. I prefer to use a bitter dark chocolate with a 70% cocoa content, but any good quality chocolate will do.

To spice things up, finish with my chilli chocolate truffles. The chilli adds warmth to the chocolate without being overwhelming. It’s a flavour combination that really works.

Hope these hit the sweet spot.


Fudgy chocolate brownies


Everyone should have a dependable brownie recipe. It’s important to get the baking time right, so check regularly with a skewer until the mixture looks set, yet still moist and slightly gooey.


250g unsalted butter

125g dark chocolate (58% cocoa content), chopped

2 cups caster sugar

4 large eggs

1 tsp vanilla essence

1 cup plain flour

¼ cup dutch cocoa

½ tsp salt

125g toasted walnuts, chopped

¼ cup dark chocolate chips


Preheat oven to 180C fan forced (200C conventional).

Lightly grease and line a 180 x 280mm rectangular shallow cake pan.

Heat butter and chocolate in a medium saucepan over low heat, stirring with a wooden spoon.

Remove from heat and stir in sugar.

Beat in eggs, one at a time and stir in vanilla.

Sift in dry ingredients and mix until thoroughly blended.

Stir in walnuts. Pour into prepared pan and sprinkle over the chocolate chips.

Bake for 45 - 50 minutes, or until a skewer comes out covered with lots of gooey crumbs. At this stage, remove from oven and allow to cool completely in pan.

Cut into rectangles.


Makes about 28.

Cherry bircher muesli

Bircher muesli is a fantastic way to start the day; it can be made ahead and the addition of cherries makes it festive enough for Christmas morning.


1 cup cherries, pitted and halved

1 ½  cup rolled oats

1 ½ cup fruit juice (try fresh coconut juice or apple juice)

1 ½ cup natural yoghurt

½ (half) cup toasted flaked almonds

2 tbsp sunflower seeds

2 tsp sesame seeds

2 tsp ground cinnamon

1-2 tbsp honey to taste

extra cherries and yoghurt to serve


Combine all ingredients together and stir well.

Refrigerate for 1 hour or overnight.

Serve with extra cherries and yoghurt.


Serves 4.

Cherries

The arrival of local cherries in the markets means two things: summer and Christmas. Unfortunately, the cherry season only lasts 100 days, so it is a matter of enjoying this seasonal fruit whilst you can. Cherries are available from November to February, with different varieties harvested at different times. The flavours range from mild to rich and sweet, and some are slightly tart or sour.

As well as being delicious, cherries are a great source of vitamin C and antioxidants and have a low GI.

When shopping for cherries, look for green stalks and shiny bright skins. The flesh should be plump and taut. The skin becomes dull when it is overripe. Avoid cherries that are soft and bruised or small and hard. Once picked, cherries will not ripen further, so are best consumed within 4 days of purchase. They last longer with the stem attached. Store cherries, unwashed and loosely packed, in an airtight container or plastic bag in the fridge. Only wash cherries just before eating as this can make them soft. Cherries can be frozen too. Wash first, then dry and store in an airtight container in the freezer for up to 6 months.

Cherries are crisp and refreshing served simply in a bowl of crushed ice. Or piled high, as an impressive centrepiece to your Christmas table. They are equally brilliant when cooked and work well with flavours like cinnamon, chocolate, coconut and almonds. Try pickling cherries for a taste sensation. Or start the day with my bircher muesli. For a fast and easy dessert, whip up my cherry sorbet.

Cherries are inextricably linked to our memories of carefree days of summer holidays. As Nigel Slater puts it “A bag of cherries is a bag of happiness”.


Seared carpaccio of beef with remoulade and pickled cherries

This is a perfect  dish for summer entertaining. Make a large platter and serve it in the middle of the table. The beef is served delicately raw on the inside, with a seared crust. If you prefer to cook the meat through, place in a 200C preheated oven for around 20 minutes. Allow it to rest for at least 15 minutes before carving.


Pickled Cherries

425ml white wine vinegar

12 pepper corns

12 allspice berries      

350g sugar

3 bay leaves

500g fresh cherries


celeriac remoulade

1 small celeriac, peeled

sea salt to season

juice of ½ lemon

5 tbsp good quality mayonnaise

½ cup chopped parsley


carpaccio

2 tbsp black peppercorns

2 tbsp coriander seeds

2 tbsp salt

1.5 kg fillet of beef

2 tbsp horseradish cream

200ml crème fraiche

juice 1 lemon

handful picked watercress

100g shaved parmesan


To make the pickled cherries, bring the wine vinegar, peppercorns, allspice, sugar and bay leaves to a simmer in a small pot. Leave to cool for 5 minutes before pouring over the cherries. Pickle for a day before placing in the fridge where they will keep indefinitely. Serve at room temperature.

For the remoulade, thinly slice the celeriac, preferably on a mandolin. Then, julienne finely into thin strips. Place in a bowl, sprinkle with a pinch of salt and allow to sit for a few minutes. Mix mayonnaise, lemon juice and parsley together, add celeriac and mix thoroughly. Set aside.

For the beef, place peppercorns, coriander seeds and salt in a mortar and pound with a pestle until coarsely ground. Rub all over the beef fillet, pressing in well.

Heat a grill pan or large frypan until very hot and sear the meat for around 5 minutes until brown and crispy on all sides. Remove from pan and rest for 10 minutes, then slice thinly and arrange on a platter.

Mix horseradish cream with crème fraiche and thin out with a little lemon juice to make a pouring consistency.

Drizzle over platter of beef slices, garnish with watercress and shaved parmesan. Serve with remoulade and pickled cherries.


Serves 6.


Mexican Wedding Cakes

Mexican wedding cakes


These melt in the mouth, shortbread-like cookies are also known as Russian tea cakes.  They are perfect for Christmas and are easy to make. Use good quality nuts and butter for the best results. Roll in sugar whilst the biscuits are still warm, then again when they have cooled.


125g pecans, almonds or hazelnuts

300g plain flour

90g caster sugar

250g unsalted butter, chilled and cubed

1 tsp vanilla extract

125g icing sugar


Process nuts until finely ground.

Add flour and caster sugar and process to combine.

Add butter and vanilla and pulse to form a dough.

Divide dough into four, then roll out each piece into a 40cm length, wrap in cling film, place on a tray and refrigerate for 30 minutes (the logs can be frozen at this stage).

When ready to bake, preheat oven to 160C (140 fan forced).

Slice off 1 cm rounds, place on lined oven tray and bake for 20 minutes until lightly coloured.

Remove from oven and rest on tray for a few minutes, then roll in icing sugar to coat.


makes 90.

Christmas gingerbread

Only 12 sleeps ‘til Christmas. That means only 12 shopping days left. How to avoid the last minute madness and mayhem? Instead of buying presents, crank up the oven and make some old fashioned home made goodies.

It can be something as simple as a box of handmade biscuits or as extravagant as a gourmet hamper overflowing with treats.

Pick up some decorative biscuit cutters, pretty boxes and ribbon and you’re on your way.

Try the gingerbread Christmas biscuits. This is a simple recipe that both adults and kids will enjoy. For a professional touch, decorate them with readymade, ready to roll white icing, available at most supermarkets.

Gingerbread Christmas biscuits

Nothing says Christmas to me quite like gingerbread. These biscuits are easy to make and look very professional with readymade icing, which is available from the supermarket. For coloured icing, add a few drops of food colouring before kneading. You will need to mix it in well.


200g butter

90g sugar

90g brown sugar

¼ (quarter) cup treacle

2 tsp cinnamon

1 tsp ground ginger

¼ (quarter) tsp ground cloves

1 egg, beaten

450g plain flour

2 tsp bicarb soda

pinch salt

500g ready made ready to roll white icing (available at supermarkets)


Cream the butter and both sugars together until light and fluffy. Add treacle, spices and egg. Mix well.

Sift flour with baking soda and salt. Add flour to butter and egg mix, a little at a time, stirring well after each addition. Knead dough lightly, wrap in cling film  and refrigerate for 1 hour.

Preheat oven to 180C (160C fan forced).

Roll out dough thinly on a lightly floured surface. Cut out shapes and place on trays lined with baking paper. Bake for 10 minutes. Remove from oven, place on wire racks and allow to cool.

Take the readymade icing out of the wrapper and knead. (If the icing is hard, microwave on medium power for 20-30 seconds to soften). Lightly dust the work surface with icing sugar and roll out the icing thinly. Cut out shapes with a pastry cutter.

Brush the cooled biscuits with water and place the icing shapes on top. Press down lightly.


makes 40.

Choc Tops

Footy colours choc tops

In Australia, we all love a choc-topped ice cream. Have a go and make your own. They’re really easy. If you’re hosting a footy party, decorate with your team colours.


1 lt vanilla ice cream

1 pk ice cream cones

200g cooking chocolate (white, milk or dark)

ready made icing tubes (in your team colours)


Melt the chocolate in a small bowl in the microwave or over a pot of simmering water. Remove from heat and allow to cool a little.

Scoop the ice cream into the cone and press down firmly. Return to freezer for a few minutes (or longer) to harden.

Turn the ice cream upside down and dip into the chocolate to coat. Place upright into a holder or stand carefully on the bench. The chocolate will harden and set.

Use the ready made icing tubes to decorate in your team colours.


makes approximately 12.